Thursday, October 13, 2016

Conference

Hi everyone. I haven't gotten to post more yet, but I have planned posts, so I promise, there will be more. Next week. Today and tomorrow I am busy at a conference with the catchy title "The cult of Saints in the Archdiocese of Niðaróss and its European Context." I am required to be there as a part of a class I am taking on the cult of saints, but I am still a bit nervous. Anyways, I'm glad I'm not having a presentation myself. Mostly glad I don't have to answer any questions after a presentation.

The worst thing is that I have to get up at 5 in the morning. I live in Hamar, and study in Oslo, so there is a one and a half hour train ride to get there. Also, I have to walk my dog before I leave.

I usually use the morning ride to read, but the ride home is usually used for playing stupid games on my phone... 

Anyways, stay posted, there will be more interesting tings popping up soon. And at least they serve cake in the coffee break. 
//
Hallo alle sammen! I har ikke kommet så langt at jeg har fått postet noe mer, men har planlagt noen ting jeg har lyst til å vise dere, så det kommer til å komme mer. Neste uke. I dag og i morgen er jeg opptatt på en konferanse med den svingende tittelen "The cult of Saints in the Archdiocese of Niðaróss and its European Context." Jeg er her fordi jeg tar et fag nå som omhandler helgener, så jeg er ikke en aktiv deltaker i så måte, men jeg er fortsatt litt nervøs. Jeg er i hvertfall glad for at jeg ikke skal presentere noe, og i hvertfall at jeg ikke må svar på spørsmålene som blir stilt. 

Det verste med det hele er at jeg må stå opp klokka fem for å komme meg hit. Ettersom jeg bor i Hamar og studerer i Oslo, må jeg kjøre tog i en og en halv time for å komme meg hit. Og så må jeg gå tur med hunden før jeg reiser da.

Vanligvis bruker jeg morgentogturen på å lese og forberede meg på forelesningene, mens turen hjem er en god del mindre produktiv som regel. Det blir en del mobilspill...

Uansett! Følg med, det kommer til å kommer mer interessante ting etter hvert. Jeg får i hvertfall kake i kaffepausa da. 


Friday, October 7, 2016

Crochet lampshade // Heklet lampeskjerm

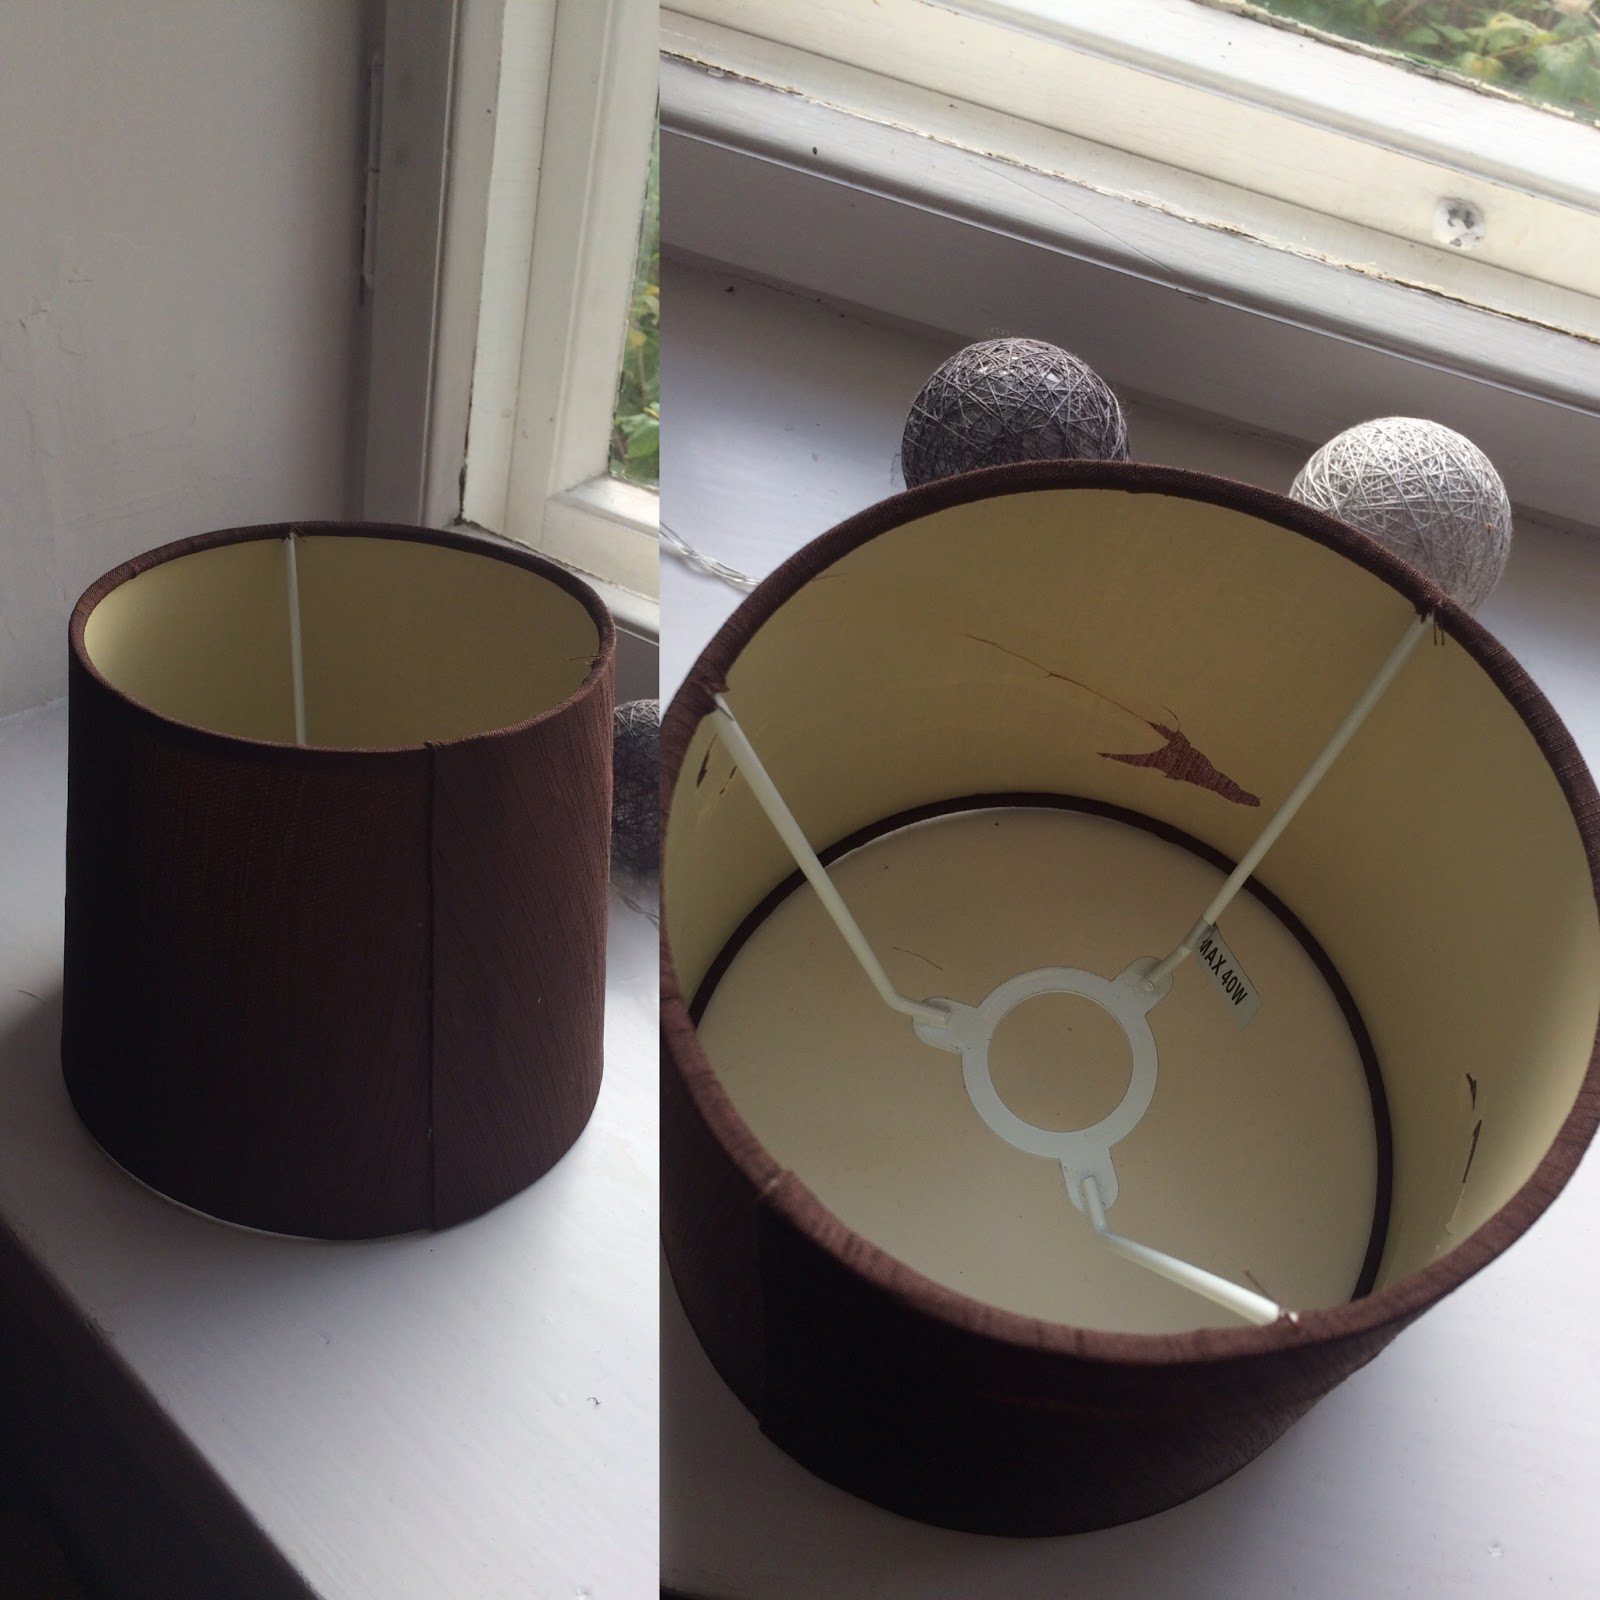
So, I bought a table lamp at a flea market at the end of summer. I just love tiny lamps! But the shade was brown, and it was broken. I bought it because I wanted another lamp and because I wanted to crochet a new lamp shade for it. I ended up with buying a new shade for it, because I found a cheap one, and that meant I could start using the lamp right away. But today I finally took care of the old lamp shade and made a new one! Here is a step by step:
//
Så, jeg kjøpte meg ei bordlampe på loppemarked på slutten av sommeren. Jeg er veldig, veldig glad i små bordlamper. Men skjermen var både brun og ødelagt, så grunnen til at jeg kjøpte den var mye fordi jeg hadde lyst på ei ny lampe og fordi jeg har hatt lyst til å hekle meg en lampeskjerm. Jeg endte opp med å kjøpe en ny skjerm til den, for da kunne jeg ta den i bruk med en gang. Dessuten kostet den meg 5 kroner. Men i dag ble det endelig noe av å fikse den gamle lampeskjermen. Sånn ca steg for steg: 

You will need // Du trenger
-An old/broken lamp shade with frame // En gammel/ødelagt lampeskjerm med ramme innvendig
-Scissors // Saks
-Some kind of bulky/really thick yarn // Veldig tykt garn
-A crochet hook that matches the yarns thickness // En heklenål som passer garntykkelsen
-If  the shade is glued to its frame, you might need something to remove the glue. I used nail polish remover and cotton pads, but it will probably depend on the type of glue // Om lampeskjermen er limt fast i rammen kan det hende du trenger noe å fjerne limet med. Jeg brukte neglelakkfjerner og bomullspads, men det kommer nok an på hvilken type lim som er brukt


After having cut the shade off, and spreading the old crispy plastic lining all over my carpet, I was left with this:
//
Etter å ha klippet bort den brune skjermen, og spredd gammel, sprø plast over hele teppet, satt jeg igjen med dette:

I don't know if it is visible, but in the picture with the nail polish remover I have already removed the glue from the frame.
//
Jeg vet ikke om det er synlig, men på bildet med neglelakkfjerner har jeg allerede fjernet limet fra ramma.

I had to types in my yarn stash: one skein of black Hoooked zpagetti, which is a t-shirt yarn and a thick interior yarn in light grey. Both of them I have gotten for my birthday, so I don't know where they were purchased or what the cost is, but I think google can help you. I ended up using the grey yarn, since I could not find my biggest hook, and the black one would have defeated the purpose of the lamp altogether. But I am certain that the Hoooked zpagetti would work with a bigger hook and maybe a lighter colour.
//
Jeg hadde to typer garn som kunne passe i garnlageret mitt. Den ene en bunt med Hoooked zpagetti i svart og den andre Big Interiør garn fra Trysil, laget for Europris, i lysegrått. Jeg vet ikke hvor mye de koster, siden jeg har fått begge i gave, men det finner dere vel ut av selv, kanskje med google til hjelp. Jeg valgte det lysegrå garnet, siden jeg ikke fant en heklenål som var stor nok til det svarte garnet, og da ville skjermen blitt så tett og mørk at det egentlig kanskje ikke hadde vært noen vits å sette den på en lampe i det hele tatt. Jeg er allikevel ganske sikker på at Hoooked zpagetti kan brukes, men da om du har stor nok heklenål og kanskje i en lysere farge. 


I started crocheting on the loose bottom ring. After some trial and error in the start up, I discovered that it is easier to start if you tie the end of the yarn to the ring. I untied it when I had made the first circle. I used all single crochet stitches, and did not join rounds, but worked continuously. On the bottom ring, I fit in 30 sc, but this will vary from the size of the frame you are working on.  
//
Jeg begynte å hekle på den nederste ringen, som var løs fra resten av ramma. Etter å ha prøvd meg frem litt, kom jeg frem til at det var lettere å starte om man knyter ended på garnet fast i ringen før man begynner. Jeg løsnet knuten etter at jeg hadde kommet rundt hele veien. Jeg brukte kun fastmasker og avsluttet ikke rundene med kjedemasker, men heklet i spiral hele veien. I den nederste ringen fikk jeg plass til 30 fm, men det varierer jo selvfølgelig etter hvor stor skjerm man starter med i utgangspunktet. 


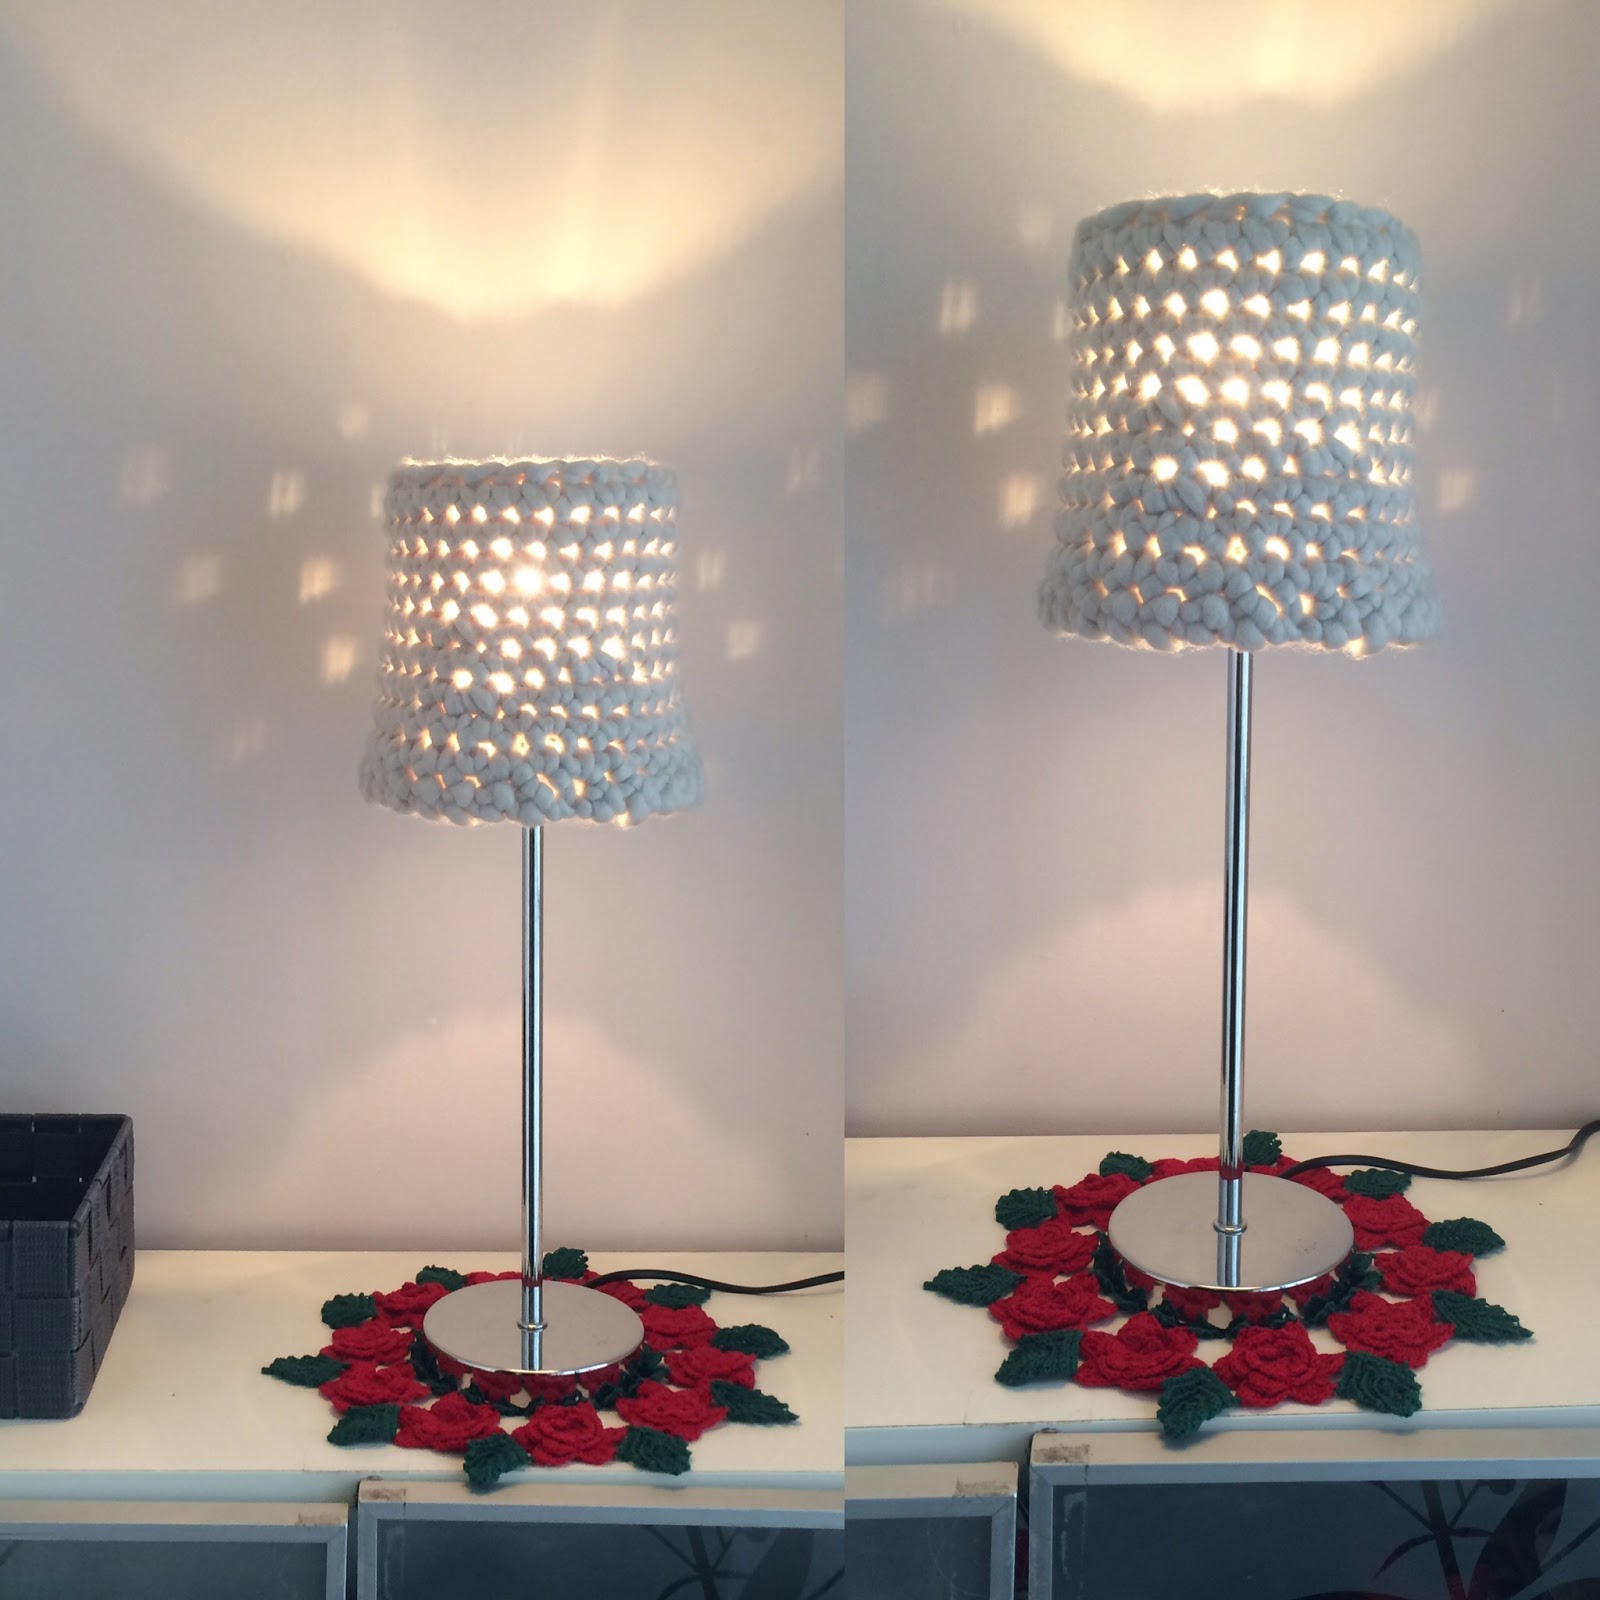
Since the top ring was smaller than the bottom ring, I had to work two and two single crochets together, but I only had to do that a few times (Forgot to count, sorry!) Just remember to do this at different places on the shade each time, and measure with the smaller ring to confirm that you have taken it in enough. Crochet rounds until you have reached desired height, minus one round of single crochets. Crocheting the top ring on was very easy, I just rested the top ring on the top of the previous round and kept crocheting. The height of the shade is also up to you, mine ended at 17 cm. End the shade with a slip stitch above where you started, so that the shade have the same height all around.

There was 2 meters left of the skein of yarn at the end of the project. I might use it to decorate the lamp shade, or I might decorate it with something else, I don't know yet.
//
Ettersom ringen på toppen var litt mindre enn det nederste, måtte jeg hekle sammen to og to fastmasker for å redusere størrelsen. Jeg glemte å telle hvor mange ganger jeg gjorde det, men det kommer jo også an på hvor stor skjermen dere lager selv er. Bare husk å felle på forskjellige steder hver gang, for å unngå at skjermen blir skakk, og sammenlign med den øverste ringen for å sjekke når du har felt nok. Når skjermen er så høy man vil ha den (minus en runde fastmasker,) legger man på den øverste ringen og hekler som vanlig, men med ringen oppå fastmaskene fra forrige runde. Avslutt med kjedemaske over der du begynte på bunnen, slik at skjermen er like høy hele veien rundt. Min skjerm endte på 17 cm. 

Det var igjen 2 meter garn etter at skjermen var ferdig. Kanskje bruker jeg det til å dekorere skjermen, eller så dekorerer jeg den med noe annet, jeg vet ikke enda.


 I really like how the light makes a pattern on the wall!


Remember to use the bulb suited to your lamp, and make sure that the shade is open at the top, to let the heat rise, and that the shade is not to close or touching the bulb.
//
Bruk riktig lyspære for din lampe, og pass på at skjermen er åpen på toppen for å la varmen stige opp. Og pass på at skjermen ikke er for nære eller borti lyspæra.


Hope you enjoyed and feel inspired!  //  Håper du føler deg inspirert!

Thursday, October 6, 2016

After a proper break...

Hello! I know there have probably not been a lot of traffic here the past years since I have not been posting in about 5 years. But know I feel like sharing a little again, so lets see what happens.
-I have decided to change the layout. That will be done by trial and error, so be patient.
-I still haven't decided a final name for the blog, as I might like to talk about some other things than hobbies too, so that also might change. I just can't figure out a name that would encompass all my weird interests.
-And, most importantly, I have decided to write all posts in both English and Norwegian, to make it more accessible. This, I hope, will give my fellow Norwegians easier access to the things I will share, and maybe also pull in some other Scandinavian readers.

Hope to see you later!

Hei! Jeg antar det ikke har vært så mye trafikk her i det siste, ettersom jeg selv ikke har postet noe her på omtrent fem år. Men nå føler jeg for å dele litt igjen, så vi får se hvordan det blir fremover.
-Jeg har bestemt meg for å forandre layouten, og det kommer til å skje ved at jeg prøver meg frem, så dere får bare være tålmodige.
-Jeg har enda ikke bestemt meg for hva som ville vært det beste navnet på bloggen, siden jeg ikke klarer finne noe ord som dekker alle de merkelige interessene mine.
-Videre, og kanskje viktigst for dere som leser dette, er at jeg har bestemt meg for å skrive hver post på både engelsk og norsk. Dette vil gjøre bloggen lettere tilgjengelig for nordmenn og forhåpentligvis vil det kanskje trekke litt interesse fra våre naboland også.

Håper vi ses senere!

Tuesday, April 10, 2012

Hi there!

I'm really not a good blogger, but here some of what I've done since last time

I've made two pairs of socks. One for my grandmother and one for myself.
This is the pair for my grandmother:


I don't have a picture of my pair. And I seriously don't know where they are. I mean, I washed them and dried them and now they are gone. I'll have to get back to you on that.

I got a new phone just after Christmas. Well, I got a phone in exchange for a lot of money. And the thing with phones today are that they are made up of one big screen, so I'm really an idiot just for buying it. But, I did, so I had to make something to protect it from the keys in my pockets. The solution was a phone cozy:


I love the little rabbit button! I made the "pattern" myself too.

As I was doing the phone cozy, I got inspired to do some appliques, and I found this cute giraffe pattern. I don't know Japanese. But the pattern diagram should be international. I think I spent the whole day trying to figure out where to start the whole thing. But then I finally got it! And .. voila..? A giraffe.


(I'm not to happy, but hey, I did it.)

I also found this incredibly cute crown pattern from the same designer, and this I'm a little more happy with:


I also tried my luck at tatting. But I failed. I think I need some serious tutoring before I can turn out something worth showing you.


Yes, It's a sock. It has rice in it. It's my home made heat pack. I'm thinking I'll crochet something to hide the fact that it is a sock with rice in it, but since I made it for my stiff neck, it'll have to wait.

I also have some work in progresses to, but I'll post them later!

Friday, September 23, 2011

Guess what!

I finished it!


I only had one round to go, so I finished it yesterday. Finally! I also ironed it, this time without spilling boiling water on my foot. I still hate picots though. One thing that sort of amazes me, is that I have a dog that is mostly black. So I thought that making a black doily would be a good thing, so that the hairs would not be as visible. But no. Some how, my Zelda thinks that shedding the black hairs is unnecessary, the white hairs however... I have no idea how I'm gonna get them off and out of this doily. I swear, I really tried to keep her and the hairs away, but still. Argh, all the hair. The doily measures 57 cm in diameter.(For comparison, the white one from earlier is 29 cm in diameter.) Still pretty happy about the final results, though!

Also, this is the other finished project I told you about earlier:
It is my first filet project. I know nothing about fileting, just the "idea" of it. And I did not follow any pattern. Well, I sort of did, but I drew the chart myself. I had to iron it, for the letters to be visible enough to read. Also, as you can see, the edges is sort of uneven. I guess I'll have to try some more filet, before I can tell you why it turned out this way. Anyways, for those of you not Norwegian, it says "Worlds greatest dad <3" My dad seemed happy, even though the uneven edges. Actually, he sort of lit up. I was going through my blog earlier, and I discovered, that I hadn't shown you my favorite doily. My first ever doily made in thread. I only had pictures of it together with the large version.


Wednesday, September 21, 2011

Three finishes in one day!

Today I've finished three projects! First I finished my first ever pair of crocheted socks: I don't know if I'll keep them myself or give then away yet, but here they are:
The photo does not give the colors justice!


Also, I finished a doily called Blue Pineapples. In white thread, ironically.I don't know what I'll do with it, maybe I'll sell it, if someone wants to buy it.

It is by no means perfect. It was sort of a training doily. I really need to learn to make consistent picots. The last round of doilies are usually where I "give up." They just seem to never end for me, so I get bored. This is the reason I still haven't finished my beautiful black pineapple doily.

By the way; I actually ironed the doily and the filet project, and while I did so I managed to pour boiling water from the iron onto my foot. It hurt...


The last item I finished was my first filet-project, but, I'm giving it away tomorrow, so I can't post it yet, in case the receiver is reading my blog.

Recently I've done several smaller projects, that I'll post later(I'm not home at the moment) But I do have one picture of one of them. A bath rug made out of plastic bags, and rubber bands.

Friday, July 15, 2011

Working with alternative materials

I've already told you about my old t-shirt rug. This is how far I've gotten on that project:
 
Sadly, the project has reached a halt, because there is no flea markets in Oslo during the summer. And it is okay, really, because when it is this hot, you don't really need a rug anyways, do you? It feels really good under foot though, can't wait 'till it's done.

This is my second project of alternative materials:

A small basket made of silver copper thread (a bit contradictory, I know). The pattern is the traditional granny square, with "even" rounds to make it stand up. I know I told you how I had to learn to hold the hook differently when working on the rug. Well, this one was even harder to do. No technique I've ever seen used would do the trick. It was hard, having to constantly change grip, and even the hook took some damage; some of the paint got scraped off. But, hey, the result isn't to bad, is it? (I haven't finished it off yet, because I'm not entirely sure how to. And I've been to lazy to find out.)

Third and last  of my alternative materials projects is a grocery bag net. Made out of plastic grocery bags. I'm not done with it yet, though. I ran out of plastic bags, because I'm to environmentally friendly always bringing fabric shopping nets. But anyways. I got the inspiration to do this by combining this pattern, with a tutorial I saw about making plarn.(Plastic yarn) 

As you can see the original idea is to use VHS tape for the net. But I don't think I have the heart to destroy a video cassette. I didn't have one handy either. And what sweet irony to make the net out of what is to fill it later. I did use the idea of the hair elastic in the opening. I did learn that I should have cut the bags in narrower strips when using the kind of bags that I used, as they seem to be a bit thicker than in the example.
 I'll make it a little taller.

And now you've also seen how RED my sofa is. I'll edit the pictures if I ever use it as a backdrop again. It's almost painful to look at! :P